

A buyer working on a high-end custom project once asked me, "How many steps does it take to turn a bare cabinet door panel into a finished painted door?"
I paused for a moment. The question sounded simple, but to answer it properly, I had to explain the whole finishing process, starting with substrate preparation.
Then he asked a more practical question: "How can I know that the finishing process in your quotation will actually give me the result I want?"
I thought about this question for a long time afterward.
It was not just about price or lead time. It was about how much a buyer could confirm before seeing and touching the finished product.
Whether a batch of painted cabinet doors can match an approved sample does not depend only on the paint brand. Substrate preparation, the order of coloring steps, the primer and topcoat system, the quality of each sanding step, and the painter's experience with color and surface finishes can all affect the final result.
A specification that only says "PU Paint, Matte Finish" does not explain all these steps. Even if it states the number of paint coats, the buyer may still not understand how the final finish is made.
So I want to explain the process from the bare substrate to the finished surface, based on how we actually work in our factory. This will help buyers understand the finishing terms. It will also help them know what can be confirmed in drawings and specifications, and what needs to be checked with a physical sample.
What Determines the Final Finish of a Painted Cabinet Door?
Before looking at the production process, let's start with a few common questions.
| Question | Key Point | How to Confirm |
|---|---|---|
| Does using PU paint guarantee the final finish? | No. PU describes the coating system. The final result also depends on the substrate, color, and finishing process. | Confirm the substrate, finish requirements, and physical sample. |
| Why do some cabinet doors need wiping stain while others do not? | Wiping stain is mainly used to adjust the color and grain appearance of natural wood. Not every painted cabinet door needs it. | Confirm whether the natural wood grain should remain visible and what color is required. |
| Are more primer and topcoat layers always better? | Not always. The number of coats should match the materials, finishing process, and final requirements. | Confirm the finishing process and final result. |
| Why does sanding affect finish quality? | The condition of the substrate and the surface between coats affects smoothness and how the finish feels. | Check the flat areas, edges, and shaped details on a physical sample. |
| Is high gloss harder to produce than matte? | High-gloss finishes usually make surface unevenness easier to see, so they require better control of surface flatness. | Check a physical sample with the required gloss level. |
| Why is a physical sample necessary? | Drawings and color codes cannot fully show wood grain, gloss, texture, and small surface details. | Confirm the color, gloss, grain, and acceptable appearance differences. |
All these questions lead to one important point: the final paint finish on a cabinet door is not just the last topcoat. It is the result of substrate preparation, coloring, primer, sanding between coats, and topcoat application.
Once you understand this, it becomes easier to review a supplier's finishing process and samples.
What Is a Paint Finish on Custom Cabinet Doors?
A paint finish is a surface treatment applied to a cabinet door substrate. It involves surface preparation, coloring, and coating to create the required color, grain appearance, gloss, and protective layer.
Materials such as melamine-faced boards and PET-faced boards usually have their main surface finish applied before they arrive at our factory. Painted cabinet doors are different. They are usually finished after the substrate has been cut and shaped.
This allows paint finishes to be used with different colors, wood grain effects, and cabinet door designs. But it also means the final appearance depends on several production steps.
If we look at the final color and wood grain appearance, we can divide cabinet paint finishes into three common types.
These are not completely separate coating systems. For example, stained wood veneer doors usually also need a clear protective coating.
Opaque Painted Finish
This is a solid-color finish, such as white, gray, or another custom color.
The paint usually covers the original color and grain pattern of the substrate. The finished surface mainly shows the color selected by the customer.
However, an opaque finish does not always mean that all wood pores are filled. Some natural wood surfaces can still show an open-pore texture under opaque paint.
Stained Wood Finish
This finish is commonly used on wood veneer or solid wood when the customer wants to keep the natural grain visible.
For example, if a customer wants to make natural white oak darker while keeping the grain visible, we may use wiping stain, spray shading, and a clear protective coating.
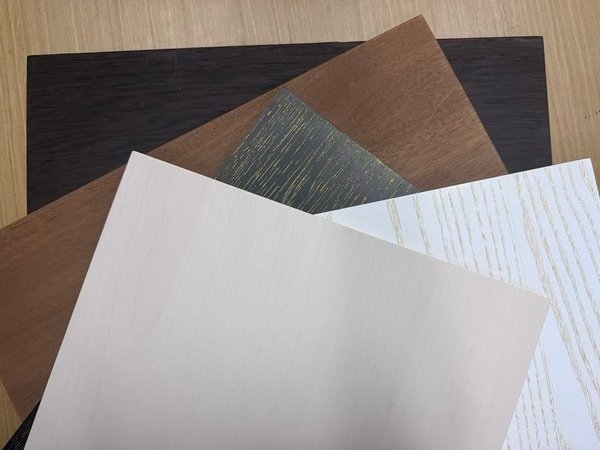
Clear Finish
If a customer wants to keep the natural color and grain of the wood, a clear finish can be used.
However, even a clear coating may change how the wood color looks. This is why we still need a physical sample. The word "clear" alone does not tell us exactly how the final surface will look.
In our factory, we mainly use solvent-based PU (polyurethane) coatings. We sometimes use NC (nitrocellulose) coatings. UV (ultraviolet-cured) finishing is handled by a specialized outside factory.
There is one difference worth understanding.
PU and NC describe coating systems. Matte, high gloss, open-pore, and closed-pore describe the final surface appearance. They are not the same type of classification.
What Steps Does a Cabinet Door Go Through Before the Final Finish?
At Horace Home, we first inspect the boards after they arrive at our factory. We then cut and shape them according to the drawings. After that, we sand the substrate and arrange the coloring, sealing, primer, and topcoat steps according to the required finish.
All spray painting in our factory is done by our painters using handheld spray guns. We do not use automated spraying equipment. For cabinet doors with different sizes, edges, and shapes, our painters adjust their spraying methods to suit the product.
So the final finish depends not only on the coating itself, but also on the painter's work, sanding between coats, and how each step is carried out.
The basic process can be shown like this:
Substrate inspection → Cutting and shaping → Substrate sanding → Staining or sealing when needed → Primer and sanding between coats → Shading and local touch-ups when needed → Topcoat → Final inspection.
However, not every product follows exactly the same order.
For example, an opaque white MDF cabinet door usually does not need wood staining. A stained wood veneer door may need wiping stain before the later primer or clear coating steps.
Let's look at a few steps that can affect the final finish.
1. Substrate Sanding: Why Don't We Always Use the Same Sandpaper Grit?
Substrate sanding is mainly done after the boards have been cut and shaped. It helps remove machining marks and prepare the panel surface and edges for finishing.
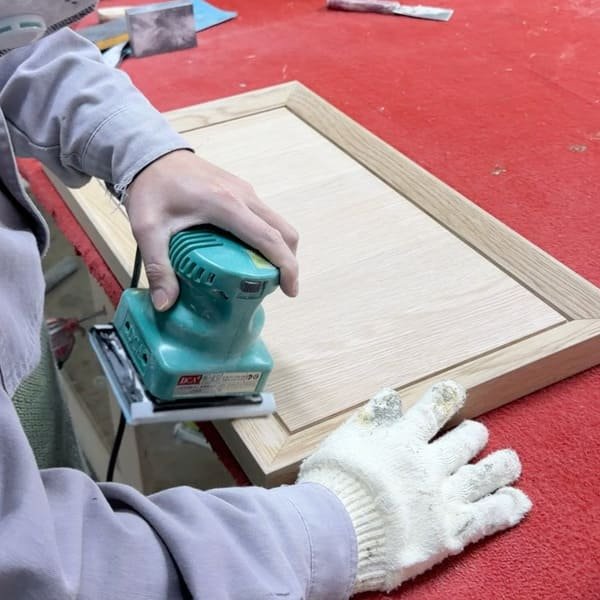
During my two discussions with our factory painters, one point came up several times: sanding is not just about making a board feel smooth.
For example, we use different sandpaper grits for different purposes.
We sometimes use 180-grit sandpaper for local corrections. For regular wood sanding, we often use 320 grit. Some finishes may require 320–480 grit.
These numbers come from different stages of our factory work. They do not mean every product goes through all these grits in order.
For some special wood textures, we may also use a steel brush to treat the wood surface, followed by nylon filaments for further surface preparation.
These different methods are used to achieve the surface effect required for each product.
If a cabinet door has visible CNC marks, small dents, or an uneven surface, simply adding more paint coats may not remove these defects.
This is especially important for high-gloss cabinet doors, where the preparation and sanding of the substrate can strongly affect the final appearance.
2. Primer: It Does More Than Add Coating Thickness
After substrate sanding, the board moves into the finishing process.
Depending on the substrate and finish requirements, some products may need a special sealer before primer.
A sealer can improve the sealing of a wood surface and help control differences in absorption. Under certain conditions, it can also slow down moisture exchange between the wood and the surrounding environment.
However, it cannot replace proper substrate selection and cabinet door construction. It also cannot guarantee that wood will never warp or crack.1
In different coating systems, primer may help seal the substrate, reduce uneven absorption, fill small pores, and prepare the surface for the following topcoat.
The actual function depends on the primer product and substrate. Not every primer has all these functions.
After applying primer, we usually need to sand the surface before moving to the next coating step.
For some products, primer and sanding help improve surface flatness step by step. For products that need to keep the wood pores open, the finishing method may be different.
This is why we cannot judge finish quality only by counting the number of primer coats.
3. Why Is the Order of Primer, Shading, and Topcoat Not Always the Same?
In actual production, not every product follows the same order of primer, shading, and topcoat.
One main reason is that different products need different colors and wood grain effects.
For example, an opaque white MDF cabinet door usually does not need wiping stain to color natural wood grain. We can arrange the primer, colored coating, and final finish based on the substrate and surface requirements.
But if a customer wants to make a light-colored natural wood veneer darker while keeping the grain visible, we may apply wiping stain first, followed by primer and a clear protective coating.
For some other finishes, our painter may choose to apply a clear primer first and then use spray shading to adjust the color. A suitable protective coating is applied afterward.
This decision is not based only on whether the color is light or dark. We also need to consider the wood species, coloring material, and required effect.
Besides the coloring order, different products may also need different numbers of primer and topcoat layers.
In our factory, regular products usually use two coats of primer and one topcoat. For some products with higher surface finish requirements, we also use three coats of primer and two topcoats.
Wiping stain, spray shading, and sanding between coats are separate steps. They are not counted as primer or topcoat layers.
So when buyers review finishing specifications, they should not judge quality only by whether a product has two primer coats and one topcoat or three primer coats and two topcoats. It is more important to confirm whether the coating system is suitable for the substrate and required finish.
The finishing order also depends on drying and recoating conditions.
For some of the PU coating processes we use, the waiting time between coats is about 3–4 hours in summer. In winter, it may take 5–6 hours or even longer.
These are typical time ranges from our factory experience. The actual waiting time depends on the coating product, temperature, humidity, and application conditions. These numbers should not be used as general rules for all PU coatings.
If the previous coloring material or coating is not ready for the next step, applying another coat too early may affect the final finish.
So the finishing process is not just about putting primer, shading, and topcoat in a certain order. We need to consider the required appearance, material compatibility, and actual application conditions.
What Is the Difference Between Wiping Stain and Spray Shading?
I think these two finishing steps are easy to confuse.
Both can change the final color, but in our factory, they use different tools, coloring materials, and application methods.
Wiping Stain: Bringing Out the Natural Wood Grain
Wiping stain is usually applied by hand by our painters.
They use a relatively concentrated coloring material and wipe it onto the wood with a cloth. The color settles on the wood surface and in the grain and pore areas.
For example, if a customer wants natural white oak veneer to have a darker color while keeping the grain clearly visible, wiping stain may be a suitable method.
However, different wood species do not always give the same result with wiping stain.
When we were preparing a cherry wood color sample at our factory, we tried applying wiping stain directly. But it did not give us the appearance we wanted. The cherry wood color looked somewhat dull. Our painter also tried applying the base color by spraying, but the result was still not ideal.
So we planned to adjust the finishing method: apply a clear primer first, use spray shading to adjust the color, and finish with a clear topcoat.
These were changes we planned based on the coloring problem we had seen. It does not mean that every step of the new method had already been fully tested and confirmed to work.
This example also does not mean cherry wood is unsuitable for wiping stain.
It shows that different combinations of wood and coloring materials can produce different colors and grain effects. For custom cabinet doors that need to keep the natural wood grain visible, a physical color sample is usually more useful than a color code alone.
Spray Shading: Adjusting the Color with a Spray Gun
Spray shading is usually done by our painters using a spray gun.
We first prepare the coloring material at a suitable concentration for spraying. Then we adjust the overall color or certain areas according to the required finish.
For example, after the first coloring step, we may find that the color is still not close enough to the approved sample. In this case, we may use spray shading to make further adjustments.
For some products, shading is done after primer and then protected by a later clear coating.
Wiping stain and spray shading are not always alternatives. Some finishes may need both methods, depending on the wood and the final effect.
We also use manual color touch-ups and spot coloring to correct small color problems along edges, corners, or other local areas.
For buyers, these steps may not appear separately in design renderings. But they can affect the depth of the wood grain, color consistency, and how closely the bulk production matches the approved sample.
What Does the Topcoat Do, and Why Is Quality Control Different for High-Gloss and Matte Finishes?
The topcoat is usually the final stage of cabinet door finishing.
It directly affects the gloss, surface feel, and protective performance of the finish.
For some of our clear wood finishes, the final topcoat has no added color. Its main purpose is to provide a clear protective layer.
However, this does not mean all topcoats are clear. For example, opaque painted finishes may use a colored topcoat system.
The final gloss is mainly controlled by the topcoat. But substrate preparation, primer, and sanding between coats also affect how light reflects from the finished surface.
This is especially clear on high-gloss cabinet doors.
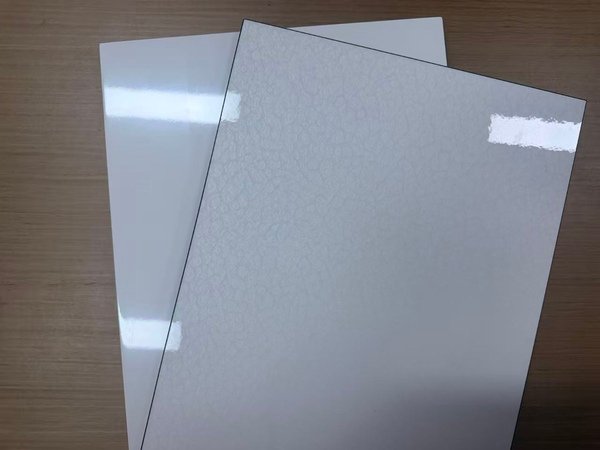
We once worked on a project with large high-gloss panels. Some panels were about 3.2–5 m tall and 0.9–1.2 m wide. After spraying, we found orange peel and other surface problems.
At that time, our factory discussed several possible factors, including substrate flatness, sanding, coating flow and leveling, and manual spraying methods. However, based on the records we have, we cannot confirm one single cause.
I mention this project to explain one point: the quality of a finished paint surface does not depend only on the final topcoat.
High-gloss surfaces reflect more light, so even small surface unevenness can be easier to see. Matte finishes have softer reflections, but this does not mean matte products can have lower basic quality requirements.
In the same way, gloss level alone does not tell us the hardness, wear resistance, or quality level of a coating.
For buyers, the important things to confirm are the target gloss, surface flatness, and the performance needed for the actual application.
What Can Be Confirmed in Specifications, and What Needs a Physical Sample?
After looking at the finishing process, let's return to the question from the buyer at the beginning:
"How can I know that the finishing process in your quotation will actually give me the result I want?"
I think we need to separate what can be confirmed in specifications from what needs to be checked with a physical sample.
What Can Be Confirmed Before Production?
In inquiry drawings or specifications, buyers can usually state the substrate, cabinet door dimensions, shape, target color, finish type, preferred paint brand (if specified), gloss level, and finishing requirements for both sides.
If the project has extra requirements for a specific coating system, these should also be explained before production.
This information helps the factory understand the product and prepare a suitable finishing plan.
However, without a clear technical reason, I would not recommend that buyers specify every sandpaper grit, a fixed number of primer coats, or one drying time for all products.
These details should be decided based on the actual materials, required finish, and coating system.
What Needs to Be Checked with a Physical Sample?
Even when buyers have a color code or reference image, some things still need to be checked on a real sample.
For example, is the wood grain still clear after staining? How does the target color look on the actual substrate? Does the gloss match the requirement? Does the surface feel the way the customer expects?
In our factory, some customers provide a physical color sample, and we make a new sample based on it.
If a customer only has a reference image, we first use the image to understand the target appearance. Then we make a physical sample for the customer to confirm.
During this process, we also discuss the customer's requirements for the substrate, color, wood grain, gloss, and surface texture.
For cabinet doors with complex shapes, buyers should not check only the large flat area in the middle. They should also look at the edges, grooves, and other areas that need the finish.
However, a physical sample is mainly used to confirm appearance and surface feel.
If a project also requires specific wear resistance, chemical resistance, coating adhesion, or yellowing resistance, the buyer needs to check the relevant technical documents. A single color sample cannot prove all long-term performance properties.
Why Does Batch Consistency Still Matter After Sample Approval?
An approved sample does not mean every panel in bulk production will automatically look exactly the same.
This is especially true for natural wood veneer. Different panels may have different natural colors and grain patterns. The wiping stain or spray shading process may also need adjustments based on the actual surface.
For opaque painted cabinet doors, bulk production also needs to control color, gloss, and overall surface appearance.
For this reason, both sides should keep a copy of the approved physical sample and clearly record its substrate, color, gloss, and finish requirements.
This gives both the buyer and the factory a common reference when checking the finished products. It is more reliable than going back to a rendering and trying to judge the color again.
Of course, an approved sample does not mean every natural wood veneer panel can look exactly the same. For natural wood finishes, buyers and manufacturers should discuss acceptable differences in color and grain before production, instead of expecting natural wood to look like a printed pattern with no variation.
Final Notes
The final paint finish on a custom cabinet door depends on more than the paint itself. Substrate preparation, coloring, sanding, and the coating process all affect the result.
For buyers, understanding these basic steps helps them explain their requirements and confirm the final finish with a physical sample.
At Horace Home, we choose suitable finishing methods based on the customer's drawings, colors, and surface requirements. We also make samples for customers to review and approve.
Based on information from the USDA Forest Products Laboratory, *Wood Handbook*. ↩