

For some oversized cabinet doors and custom woodwork door panels, we usually consider using an aluminum honeycomb core structure. This structure helps reduce panel weight while providing good bending stiffness through the honeycomb core and the two face panels. However, using an aluminum honeycomb core does not mean the entire door will never warp.
We previously worked on a sales office woodwork project that included a concealed door measuring 3.2 m high and 0.93 m wide. The door was made with a 5+15+5 mm aluminum honeycomb core plywood structure. However, after the first installation, the middle of the door bowed outward by about 25–30 mm. During the second build, we replaced the MDF decorative moldings with plywood, but the door still showed 10–15 mm of bowing after installation.
Why Did a 3.2 m Tall Concealed Door Keep Bowing in the Middle?
After two rounds of bowing and a third structural adjustment, we believe that the asymmetrical structure created by the decorative moldings attached only to the front face was likely an important factor affecting the stability of this door.
An aluminum honeycomb core panel gets some of its bending stiffness from the core and the two face panels. But the complete door also includes wood-based face layers, decorative moldings, and connections between different parts. All these factors need to be considered together. We cannot judge the stability of the entire door based only on the core material.
In the first two builds, we changed the molding material, but the moldings were still attached only to the front face of the door. In the third build, we changed this design. We replaced the surface-applied moldings with a perimeter frame reinforced with galvanized square steel tubes. This frame was then connected to a smaller aluminum honeycomb core panel.
After the third modification and installation, we have not observed the same obvious bowing that appeared in the first two builds.
The table below shows the main differences between the three builds:
| Build | Perimeter Molding Structure | Observed Result After Installation |
|---|---|---|
| First build | 25 × 68 mm MDF moldings, attached only to the front face | Middle of the door bowed outward by about 25–30 mm |
| Second build | 25 × 68 mm plywood moldings, still attached only to the front face | Middle of the door bowed outward again by about 10–15 mm |
| Third build | Perimeter frame measuring 50 mm thick and 81 mm wide, with 40 × 40 mm galvanized square steel tubes inside, connected to a smaller aluminum honeycomb core panel | No recurrence of the previous obvious bowing observed so far |
There is one important point to explain. Before the first deformation, rainwater had entered the project site. In the third build, we also changed several things at the same time, including the perimeter frame, internal reinforcement, and connection method.
Therefore, we cannot use this single case to prove that the one-sided moldings were the only cause, or that one specific change solved the problem by itself.
However, this experience gave us a clear direction for future checks: for oversized doors, we should not judge stability based only on the core material. We also need to check the full cross-section, perimeter moldings, and how these parts are connected.
Below is what happened during the three builds and how we handled the problem.
The Problem Started on a Sales Office Wall: 3.56 m of Wall Paneling, but Only One Concealed Door
This project was located near the entrance to a gym in a property sales office, on the wall where the fire hydrant was located.
The wall was about 3.56 m long and 3.2 m high, with wood veneer wall paneling across the entire surface. To keep the fire hydrant area looking the same as the surrounding panels, we built a concealed door into the wall. The door was 0.93 m wide and 3.2 m high.
From the front, the decorative moldings divided the wall into four sections that looked like doors. However, three of them were fixed wall panels. Only one was a real concealed door that needed to open and close. All four sections had the same decorative moldings around their front edges to keep the overall appearance consistent.
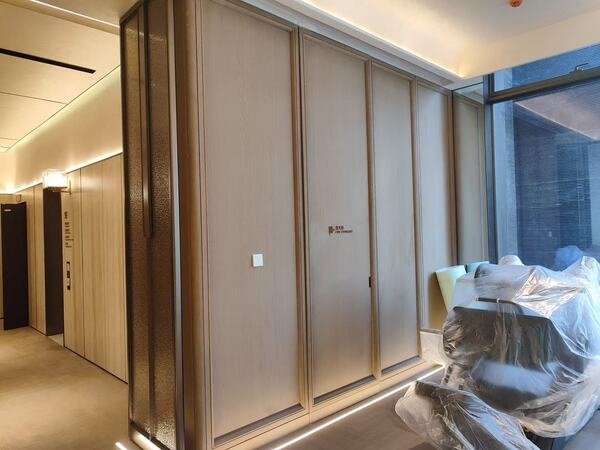
The concealed door used a 5+15+5 mm aluminum honeycomb core composite structure:
The middle layer was a 15 mm aluminum honeycomb core, with 5 mm plywood on each side. The visible surface was finished with white oak veneer and paint. MDF decorative moldings, 25 mm thick and 68 mm wide, were also attached around all four sides of the door's front face.
In the original design, the aluminum honeycomb core composite panel was 25 mm thick. With the additional 25 mm molding on the front, the total thickness at the molding area was about 50 mm.
Because the door was 3.2 m high, we needed to consider the load on the hardware and how the door would open and close. We chose top and bottom pivot hinges instead of conventional side-mounted hinges.
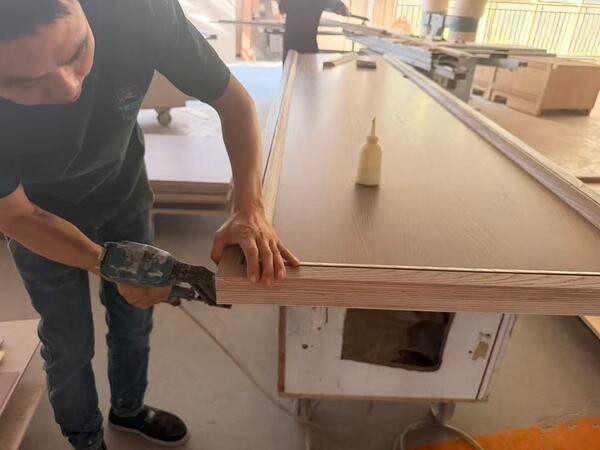
From the outside, the concealed door looked almost the same as the three fixed wall panels beside it. However, the concealed door needed to open and close, so its installation, support, and structural constraints were different from those of the fixed panels.
This difference in how the panels were used later became one of the factors we considered when reviewing the door structure.
First Build: 25–30 mm of Bowing — We Initially Suspected Moisture and MDF
In the first build, the decorative moldings around the concealed door were made of MDF.
After the door panels arrived at the project site, the interior work was not yet finished. Heavy rain then caused water to enter the building, and many of the panels were soaked.
After the concealed door was installed, we found that the middle of the door had bowed outward. The maximum deformation recorded at that time was about 25–30 mm.
Because rainwater had entered the site, we initially suspected that the MDF moldings had changed in size after absorbing moisture, affecting the stability of the entire door.
MDF is a wood-based fiberboard. When it is directly exposed to water or large changes in humidity, it may absorb moisture, swell, and change in size. However, we did not test the moisture content of the MDF at that time, so we could not determine how much moisture it had absorbed or how much it contributed to the door deformation.
To keep the sales office project on schedule, the installation team first carried out a temporary repair on site.
They cut several horizontal grooves into the back of the door panel, hoping to reduce the bowing by changing part of the panel structure and releasing some of the restraint.
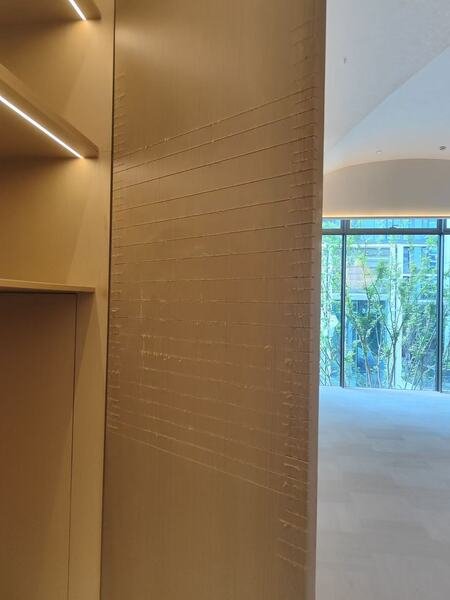
After the grooves were cut, we could see the middle of the door starting to spring back. The bowing became less obvious, but the door did not return to a completely flat condition.
This observation suggested that the deformation might not be related to the material alone. The overall structure and how the panel was restrained also needed further attention.
Of course, this did not prove that the one-sided decorative moldings caused the deformation. It also does not mean that cutting grooves into the back of a door is a general repair method for oversized door panels.
At that time, we still believed that moisture exposure and the MDF material might be the main factors. So when we made the door again, the first thing we changed was the molding material.
Second Build: We Replaced the Moldings With Plywood, but the Door Still Bowed by 10–15 mm
When we made the door for the second time, we believed that the first deformation might have been related to the dimensional stability of MDF under humid conditions. We therefore replaced the MDF moldings with plywood.
This time, the basic aluminum honeycomb core composite structure remained almost the same. The perimeter moldings were still attached to the front face of the door.
After the second installation, the middle of the door bowed outward again. The recorded maximum deformation was about 10–15 mm.
Although this was less than the first time, it was still not acceptable for a concealed door that needed to stay flat and visually aligned with the surrounding wall panels.
We then started comparing what had changed and what had stayed the same between the first two builds.
The molding material had changed from MDF to plywood. However, the door height was the same, the middle panel still used an aluminum honeycomb core, and the decorative moldings were still attached only to the front face.
This showed us that simply changing the molding material had not solved the bowing problem.
Because the site conditions during the two installations may not have been exactly the same, we also could not say that the smaller deformation was caused directly by switching to plywood.
After the second failure, we stopped trying different molding materials and started checking the full cross-section of the door.
Why Did We Start Checking the Entire Door Cross-Section After Two Failures?
The first two builds had one structural feature in common: the decorative moldings were attached only to the front face of the door.
The aluminum honeycomb core composite panel itself had a core in the middle and plywood on both sides. However, after adding a thick ring of decorative moldings to the front, the complete door no longer had a simple, symmetrical sandwich structure.
We began to suspect that this uneven structure, created by the one-sided moldings, might be related to the bowing in the middle of the door.
In laminated wood panels, differences in face materials and changes in size caused by moisture absorption and drying can create uneven internal stresses and lead to warping.1 This is why balanced construction is important when manufacturing and using composite panels.
However, a laminated wood panel with a finish on only one side is not exactly the same as our door with raised decorative moldings on one side. These technical principles helped us understand why the uneven cross-section was worth checking, but they could not directly prove that the one-sided moldings caused our aluminum honeycomb core door to bow.
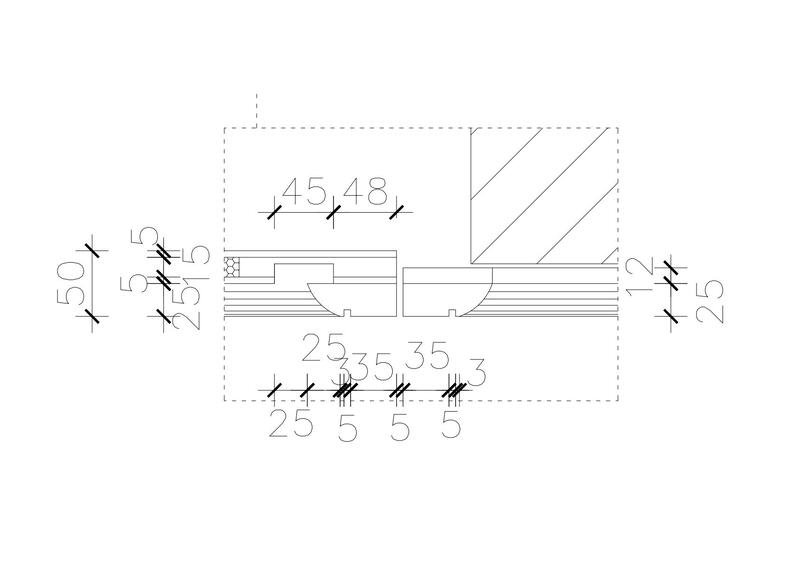
The original cross-section drawing shows that the aluminum honeycomb core composite panel was 25 mm thick, with another 25 mm of decorative molding added to the front.
Although the total thickness at the molding area reached 50 mm, the moldings did not form a complete perimeter frame with the middle panel. They were simply attached to the visible face.
There was another practical condition we needed to consider.
All four sections of the wall looked the same, but the three fixed wall panels could receive some support and restraint through their connections to the wall structure. The concealed door, however, had to rely on its own structure and hardware while keeping enough clearance to open and close normally.
This meant that the fixed wall panels and the moving concealed door had different support and restraint conditions.
We could not simply assume that a structure suitable for the fixed wall panels would also work for the moving concealed door, even if they had the same decorative design.
Based on the first two failures, we concluded that the one-sided perimeter moldings were likely an important part of the structure that needed to be changed. The issue was not simply whether the moldings were made of MDF or plywood.
So for the third build, instead of changing the material again, we asked a different question: could we make the perimeter moldings part of the overall door structure, rather than attaching them only to the front face?
What Did We Change in the Third Build? From Surface-Applied Moldings to a Perimeter Frame
For the third build, we still needed to keep the original decorative appearance because the concealed door had to match the fixed wall panels beside it.
However, we changed the internal structure.
First, we redesigned the perimeter molding structure.
In the original design, 25 mm thick decorative moldings were attached to the front of a 25 mm thick aluminum honeycomb core composite panel.
In the third build, we redesigned the perimeter section as a frame measuring 50 mm in overall thickness and 81 mm in width. Instead of simply covering the front face, the decorative section became part of the complete door structure.
Second, we added galvanized square steel tubes inside the perimeter frame.
The new perimeter frame used 40 × 40 mm galvanized square steel tubes as reinforcement around the frame.
We wanted this reinforcement to improve the frame's resistance to bending, rather than continuing to rely on the wood-based moldings attached to one side.
The 40 × 40 mm size was used for this specific project. It is not a standard size that should be used for every oversized door.
Finally, we changed how the perimeter frame connected to the aluminum honeycomb core panel.
Unlike the first two builds, we reduced the size of the middle aluminum honeycomb core composite panel. We then connected it to the new perimeter frame containing the galvanized square steel tubes.
This changed the original design from a "full-size core panel with decorative moldings on the front" into a complete structure made of a "smaller aluminum honeycomb core composite panel with a reinforced perimeter frame."
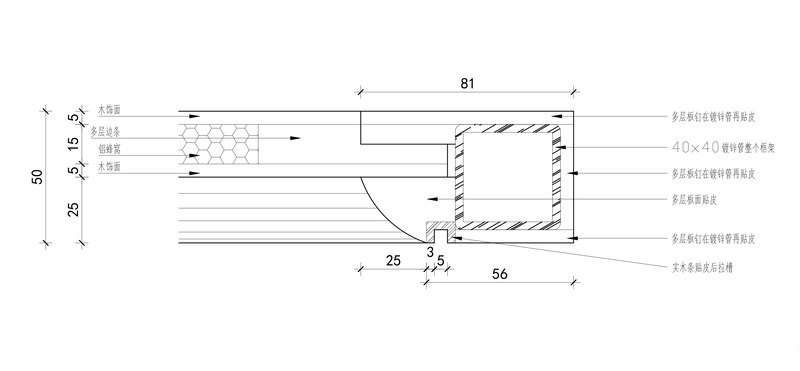
The revised cross-section drawing shows that the perimeter frame was 50 mm thick and 81 mm wide. The 40 × 40 mm galvanized square steel tube was placed inside the frame, and the surrounding plywood parts connected the frame to the middle core panel.
The main change in the third build was not just adding metal reinforcement. We changed the surface-applied moldings into a perimeter frame that formed part of the overall door structure, then connected it to the middle aluminum honeycomb core composite panel.
After the third door was completed and installed, we have not observed the same obvious bowing that appeared in the first two builds.
However, we changed the frame section, internal reinforcement, and connection method at the same time. Therefore, we cannot say which individual change played the biggest role.
For this project, the result of the third build was closer to what we expected. However, this design still needs to be evaluated based on the actual door size, materials, and structural requirements. It should not be treated as a universal solution for every oversized door.
What Would We Check Before Making a Similar Oversized Door Again?
If I work on a similar oversized door again, I will not focus only on the core material specified by the client. Before deciding on the production plan, I will check the door dimensions, perimeter moldings, and full cross-section together.
This is especially important for concealed doors with decorative moldings. A front elevation drawing can show the desired appearance, but it cannot fully explain the internal door structure.
For similar projects, I would focus on the following five points.
1. Door Dimensions and How the Door Will Be Used
First, confirm the door height and width, and whether the panel will be fixed to a wall or used as a moving door.
In this project, the three fixed wall panels and the concealed door had the same appearance. However, the moving door needed to be supported by hardware and used for regular opening and closing.
So we should not ignore their structural differences simply because they have the same finish and decorative design.
2. The Full Door Cross-Section, Not Just the Core Material
If a client specifies an aluminum honeycomb core, we still need to confirm the materials and thicknesses of the face panels, the finishes on both sides, and the position of the perimeter components.
For oversized doors with raised decorative moldings, we need to see whether the moldings are only attached to the front face or have become part of the overall door structure.
3. Perimeter Molding Structure and Connection Details
Besides confirming the molding material and dimensions, we need to understand how the moldings connect to the middle panel, whether there are one-sided components, and whether internal reinforcement is needed.
For similar oversized doors, we would first review a complete door cross-section drawing. We would check whether the perimeter components are attached only to the front, whether there is internal reinforcement, and how the perimeter frame connects to the core panel. We would then decide whether the original design needs to be adjusted.
If a metal frame is used, we should not simply copy the 40 × 40 mm galvanized square steel tubes from this project. The actual dimensions and connection details still need to be decided based on the specific door structure.
4. Site Conditions and Panel Storage
Before the first deformation in this project, rainwater entered the site and soaked many of the panels.
For projects where interior construction is not yet finished, we would pay more attention to how the panels are stored after delivery, especially the risk of direct water exposure or long periods of high humidity.
Even when an aluminum honeycomb core is used, the door may still contain plywood, wood veneer, and other wood-based materials. The moisture resistance of the aluminum honeycomb core alone does not mean the entire door is waterproof.
5. Door Weight and Hardware Installation Conditions
For this project, we used top and bottom pivot hinges to suit the 3.2 m tall moving door.
However, hardware selection still needs to consider the actual door weight, dimensions, installation position, and the load capacity specified for the hardware.
The bending resistance of the door structure and the load capacity of the hardware are two different issues. One cannot replace the other.
For overseas custom projects, these details should be confirmed before production, rather than making changes after the panels arrive at the project site.
Final Notes
After the rework on this project, we changed what we focus on when checking oversized doors. An aluminum honeycomb core composite structure can help reduce weight and provide good bending stiffness, but the stability of the complete door also depends on its face materials, perimeter moldings, connections, and working environment.
For me, the most valuable lesson from this project was not finding one fixed size of steel reinforcement. It was that after two failures, we changed how we checked the problem: instead of looking at one material alone, we started evaluating the entire door structure as a whole.
If you are planning similar oversized cabinet doors, wood veneer concealed doors, or other large custom woodwork, Horace Home can review the dimensions, design drawings, and material requirements with you to discuss a suitable structure for production. We prefer to confirm these details before manufacturing rather than dealing with door deformation after the panels arrive on site.
Based on information from the Composite Panel Association (CPA) technical bulletin *Minimizing Warp in Laminated Particleboard and Medium Density Fiberboard* (2024). ↩